If you’re still using FTP to deploy your web application or site to IIS (Internet Information Services) - you’re doing it wrong.
I thought that every .NET developer would know about Web Deploy, but I just recently learned that’s not necessarily true. So what exactly is Web Deploy and how does it work?
In a nutshell, Web Deploy simplifies the deployment of web applications to an IIS web server by synchronizing it with your local version.
Note that it is an extension on top of IIS and not the technology stack you’re using (ASP.NET, PHP etc.). That means it will help you to streamline your deployment process no matter what you’re developing in as long as the web server you want to deploy to is IIS.
In this post I’ll run you through a step-by-step example of deploying a standard ASP.NET MVC application with Web Deploy from Visual Studio to an IIS web server running on Amazon EC2.
Sounds good? Let’s get started then.
Create EC2 instance#
If you don’t already have an AWS account, go ahead and sign up. Amazon offers a Free Usage Tier to get you started in the cloud, which includes 750 hours of Windows Micro Instances on EC2 each month for one year.
Once you’re signed in, open the EC2 Management Console, go to Instances and select Launch Instance. In the Quick Start tab select Microsoft Windows Server 2012 Base as the Amazon Machine Image (AMI).
For this tutorial you can just stick with the instance default settings, but at the step Configure Security Group create a new security group (e.g. webdeploy-tutorial) and add two rules:
Protocol HTTP with port 80 and a Custom TCP Rule with port 8172 (that’s the port Web Deploy is listening on).

Review and launch your instance#
Before the instance launches AWS will ask you to select an existing key pair or create a new key pair. For Windows AMIs, the private key file .pem is required to obtain the password used to log into your instance. Make sure to download it before you continue. You won’t be able to download the file again after it’s created.
Connect to Windows Server via Remote Desktop#
Once the instance is created, select it in the EC2 Management Console and click on the Connect button. Follow the instructions to retrieve the Administrator password and download the Remote Desktop File.
Remote connect to the server instance using that .rdp file and enter your credentials.
Install Web Deploy#
On a fresh Windows Server instance Internet Explorer is the only installed browser, and furthermore it’s configured by default with Enhanced Security Configuration enabled, so you can’t just browse ahead and download something.
Don’t get me wrong - that’s generally a good thing for various security reasons - but it’s a pain in the butt if you want to write a step-by-step tutorial.
Thankfully there are plenty of ways to download or share files on a Windows Server. Personally I prefer to download first to my local machine and just copy and paste the files via Remote Desktop’s clipboard sharing, but do whatever suits you best.
Install Web Platform Installer#
We’re going to install Web Deploy via Microsoft’s Web Platform Installer. The Web PI is a simple tool that automates the installation of Microsoft’s entire Web Platform.
Browse to https://www.microsoft.com/web/downloads/platform.aspx and download the Microsoft Web Platform Installer.
Run the wpilauncher.exe file to install the Web Platform Installer on your server.
Install Web Deploy for Hosting Server#
Now let’s install Web Deploy. Open the Web Platform Installer, search for web deploy, select Web Deploy 3.5 for Hosting Servers, click Add and Install.
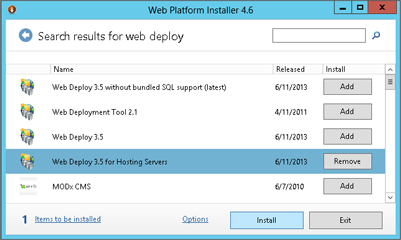
This will take a few minutes and most likely also install some depending products.
Setup web server (IIS)#
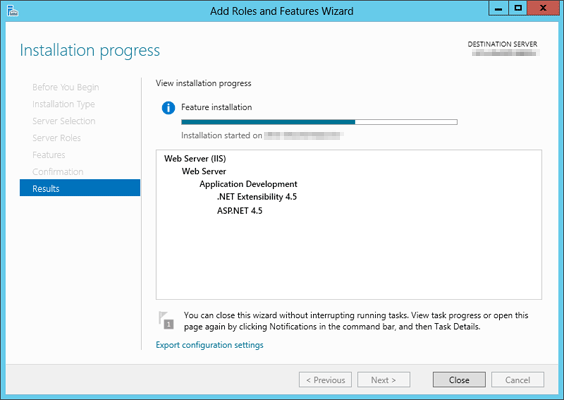
We’re going to deploy an ASP.NET MVC 4 project, so we need to additionally install the .NET Framework 4.5 Features on this web server.
Otherwise you’ll end up with a 500 Internal Server Error or to be specific:
HTTP Error 500.21 - Internal Server Error
Handler "ExtensionlessUrlHandler-Integrated-4.0" has a bad module "ManagedPipelineHandler" in its module list
To install the .NET Framework 4.5 Features, open the Server Manager and go to Server Roles. Navigate to Web Server (IIS) > Web Server > Application Development, select .NET Extensibility 3.5 and ASP.NET 4.5 and click Install. Voilà.
Add a new website#
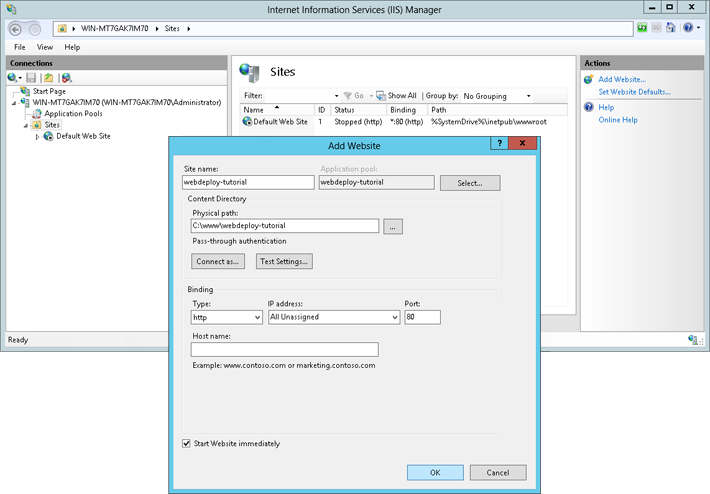
First create a new directory C:\www\webdeploy-tutorial.
Next, open the Internet Information Services (IIS) Manager (Windows Key + Q and type iis). Stop the Default Web Site and add a new website webdeploy-tutorial pointing to that directory.
Create ASP.NET MVC project#
Back on your local machine open Visual Studio and create a new ASP.NET MVC 4 Web Application with the name webdeploy-tutorial and choose Internet Application as your template.
Publish via Web Deploy#
Now that you’ve made it this far we can finally get to the good stuff and use Web Deploy.
In Visual Studio, select the project in the Solution Explorer and either right-click it and select Publish… or in the navigation bar select BUILD and then Publish webdeploy-tutorial.
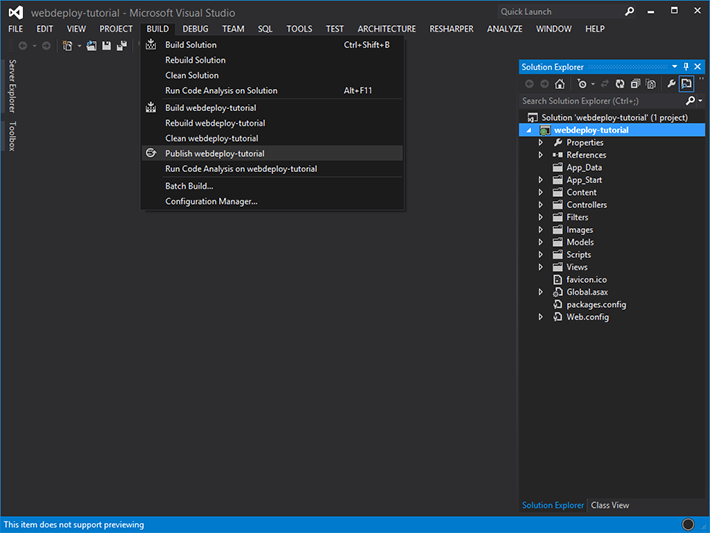
You should now see a new window Publish Web.
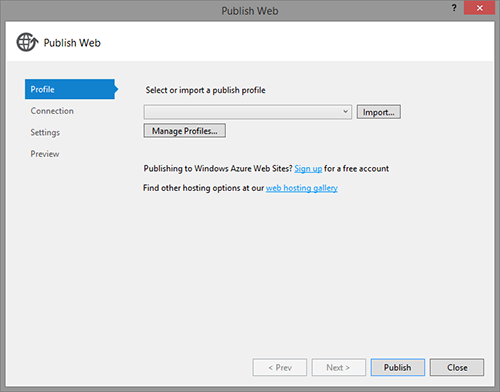
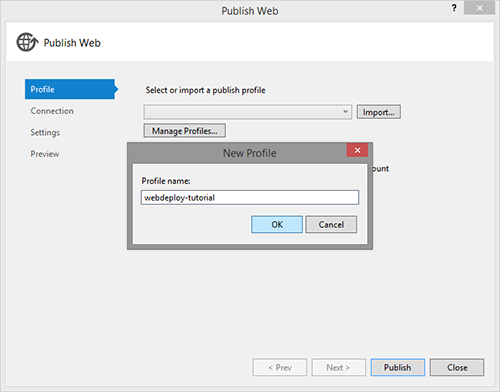
Click on the drop-down list and select <New Profile…>, enter a profile name webdeploy-tutorial - you guessed it - and click OK.
On the Connection screen you’ll have to provide the connection details of the EC2 Windows Server instance and the name of the IIS website you want to deploy to.
Use your EC2 instance’s Public DNS for the Server field (e.g. ec2-54-211-203-178.compute-1.amazonaws.com). The Site name is the actual name of your website in IIS, so in our case webdeploy-tutorial.
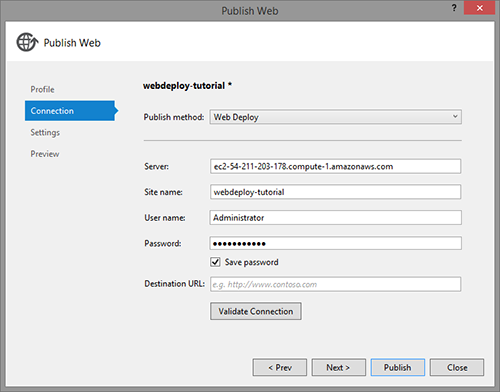
Press Validate Connection.
You’ll most certainly get a warning about the security certificate:
The security certificate presented by this server (ec2-54-211-203-178.compute-1.amazonaws.com) was issued to a different server
The security certificate presented by this server was not issued by a trusted certificate authority
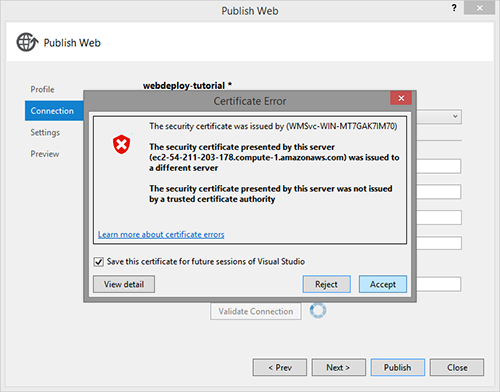
Take note of the warning, check Save this certificate for future sessions of Visual Studio and click Accept.
I particularly mean “take note” and not ignore it. Even if they are sometimes annoying or you’ve seen the same warning already a million times, notice them, skim over them and then make a decision. Never just ignore something and click ahead.
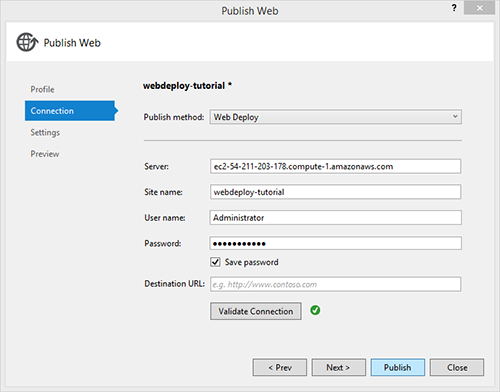
Now that your connection settings are validated you can click the Publish button.
You’ll notice some Web Deploy specific activity in your Output window. I formatted the output a bit and reduced the noise so that we can better see what’s going on here:
------ Build started: Project: webdeploy-tutorial, Configuration: Release Any CPU
------ Publish started: Project: webdeploy-tutorial, Configuration: Release Any CPU

Transformed Web.config.
Auto ConnectionString Transformed.
Start Web Deploy Publish the Application/package to
  https://ec2-54-211-203-178.compute-1.amazonaws.com:8172/msdeploy.axd?site=webdeploy-tutorial
Publish Succeeded.

====== Build: 1 succeeded, 0 failed, 0 up-to-date, 0 skipped
====== Publish: 1 succeeded, 0 failed, 0 skipped
As you can see, first the project gets built as Release. You can change the configuration in Web Deploy’s Settings screen.
Then it transforms your Web.config file with the transformation actions defined in your Web.Release.config. You can read more about Web.config file transformations and how they work here.
The next line Auto ConnectionString Transformed. isn’t really relevant in our scenario, but Web Deploy offers an additional process of changing the connection string in your Web.config file along the file transformations. Again, you can play around with it in Web Deploy’s Settings screen under Databases.
Finally it starts the Web Deploy Publish process and deploys the project to our IIS web server on the EC2 server at https://ec2-54-211-203-178.compute-1.amazonaws.com:8172/msdeploy.axd?site=webdeploy-tutorial.

Wrapping it up#
So why is Web Deploy so much more convenient than using good old FTP?
Well, it’s actually really easy to setup and once it is, you can build and deploy your web application with a single click. Whereby Web Deploy does all the heavy lifting by taking care of your automation process and file transformations. It also makes sure that all of your files on the web server are in sync with your local version and only relevant files are getting deployed.
So if you’re not already using Web Deploy, give it a try. You’ll love it.
